Showing posts with label stencil. Show all posts

Saturday, March 10, 2012

Decolorant Experiments

I decided to try decolorant ( a type of discharge paste) again.  I used it during the summer but with little success.  Can't just discard it with only one try, so I pulled out dark hand-dyed fabrics and some stencils and tried again.

These worked very well.  The fabric didn't discharge to white, but that wasn't whaat I wanted anyway.


The discharge was to a much lighter tint of the original fabric, on the red/violet, brown, blue/violet and medium green, the olive green discharged to a golden brown, interesting.  The red, orange, and fushia to a creamy color.  I could have kept ironing the paste fabric but I found that the paste spread out and haloed after about 90 seconds.

The next set didn't come out as clearly, all but the yellow probably could have been ironed longer, the yellow just wasn't dark enough.


I'm not sure what more I'll do to them, probably some paint sketching or threadwork on the discharge areas. 

I also tried decolorant plus.  This is discharge with paint added to it.  Needless to say, it comes in quite a few colors.  I started off trying a three pack of orange, lime green, and purple.  Then while I was at Quiltfest of NJ last week I bought 2 more 3 packs - persimmon, brown and autumn yellow and orange ice, robins egg blue and carnation.  I would have liked to get the primaries - red, yellow, and blue, but they were out - another time. 

Mostly they came out well.  I used stencils again.  It takes the color out and leaves the paint on top.  I do have to watch out what colors I use on the fabric so that there is a good contrast, otherwise it doesn't show up very well.


These are some that didn't work out so well, my color choices on the red fabric weren't all clear, I shouldn't have used orange and brown, they just don't show up very well.  The yellow fabric with sunflowers just look like I painted them.  The bottom fabric is a commercial batik that I used the white decolorant on, I'm undecided on how that turned out.


All in all I'm happy with the outcome.  Now I have to think about how to use the blocks in a quilt or quilts.  Ideas are starting to formulate in my mind.


Tuesday, October 4, 2011

Dyeing Again

The past few days I've been discharging, overdyeing and doing 3 layer parfaits. 
I started with previously dyed fabrics for discharging.  I started with decolorant and stenciled a few fabrics.  After they dried I steamed the fabric to activate the decolorant.  I was not very satisfied with the results. 

. 
I had expected a much clearer design result.  It could have been that I didn't use enough, but felt if I used more, it would have leaked under the stencil and given a blurred image.  I'll have to try again using a different approach. 

I went back to my usual discharging of using soft scrub wigth stencils, thermofax screens and circles with a bleach pen.  The soft scrub reacts fast, then rinse and soak in anti-chlor to stop the bleach reaction.  I never know what the discharge coloring will be, but thats part of the excitement. 
My plan after discharging was to overdye the fabrics with thickened dyes and the same stencils.  I mixed the thickener with diluted dyes for the colors I wanted.  Some were dark enough to work, others weren't and didn't show up.  Lesson 1 - learned that I should have used straight dye solution with the thickener to make it more concentrated.
Below are ones that did turn out good.  A couple I overdyed several times with different colors.


I also fold dyed fabric using different folding methods , then dipped the edges into the dyes.  Lesson 2- don't squeeze out excess dye.  this spreads the dye too much and end up with mushy designs.


Towards the end I didn't squeeze the fabric and got clearer results. 

The last day I used up extra dye and made a couple sets of 3 layer parfaits.  On the right I started with first layer of orange/brown mix, layer 2-dark red, layer 3- brown.  Each layer absorbed some of the next color layer and worked out good.   On the lef,t I started with green, layer 2-navy, and layer 3-purple.  The colors were too closely related and color mixes didn't come out as clearly.


The next ones I used half yard pieces instead of fat quarters.  Left side I started with yellow/green, layer 2- dark green, and layer 3-brown.  the colors flowed nicely through all layers.  The right side layer 1-red/violet, layer 2-purple, and layer 3-gray.  These 3 fabrics basically kept that layers color.


I was happy with most of my work and fabrics that didn't turn out I decided to paint instead.  It was a productive few days and am now waiting for some sunny days with little humidity to try flour paste resist.


Tuesday, May 17, 2011

Falling Petals

SAQA (Studio Art Quilt Association) is going to have an online auction starting September 12,2011. They are accepting quilts that are a maximum of 12" x 12" and you must be a member. The proceeds go towards funding travel exhibits, catalogs, and out reach programs.

I haven't been a member for that long, a little over a year, and felt that entering a quilt was a good way to help support the group.

Below is the quilt I entered.


I used 4 crazy patch blocks that I meander quilted, gessoed, then stenciled a leaf branch over. Around the branch I stitched on small silk flowers with a bead in each center to hold them on. I stitched veins in each leaf with a lighter shade of green thread to make them stand out.


A detail of it is below.


Go to www.saqa.com for more details on the auction and how you can bid on one of the many quilts for sale.

Saturday, February 26, 2011

Start of New Quilt

Over the summer I started dyeing fabric for a new quilt. After dyeing I had taken some fabrics and discharged and overdyed them. These I wrote about in earlier posts when I was working on them.

The end of last month and the first week of this month I reviewed all of these fabrics and decided some still needed some more texture on them. I got out the paints and paintsticks, stencils, stamps, and rubbing plates and got to work.

I used irredescent paintsticks and rubbing plates over some of the fabrics.


Next I used paint, both metallic and matte with stencils. Last was stamps and paint.


After they all dried, they were heat set.

With the dyed, overdyed, discharged, rubbed, stencilled, and stamped fabrics gave me a diverse group to make this quilt.

Now I can get down to the sewing.

Will keep you informed.

Friday, September 10, 2010

Labor Day Dyeing Spree

Summer is coming to an end and time for dyeing (even in my garage) will soon come to a halt.
So with this in mind I set myself up for a dyeing frenzy.

I started Friday with my friend Martha. Got some of the dyes and fabric ready and went to her wet studio for the first day. Go to her web site for her work. http://www.marthahallart.com/. I kept it pretty simple by dyeing a range of greens with black dyes.
I also dyed a few stray pieces that I have previously done but ran out of and now need.

Saturday was a family picnic, so I started rinsing Fridays fabrics in the morning.

Sunday, I started by stenciling previously dyed fabrics with thickened dye. Some of these were previously discharged with soft scrub. I covered the fabrics with plastic and let them cure for 24 hours. I was moving right along.


Next I wanted to try "Tray Dyeing" by Leslie Morgan & Claire Benn. I soda soaked fabric for 30 minutes then fan folded the fabric into a large bin. Mixing up my colors I squirted gold in the center making sure it saturated the fabric, squirted blue on the edges of the gold and massaged the dye into some of the gold. Last I added red to the edges and again massaged the dye into the blue, I tilted the tray so some of the red dye went down under the folds.
I let this cure for 24 hours before rinsing. I did a second fabric using orange, green and ultra violet dyes.
I went on to do 3 layer parfaits. The first set I used yellow/orange, on the first layer, red/violet on the second layer, and blue/green on the third.

The second set was yellow/green first layer, blue/violet second layer, and red/orange third layer.
I mixed up more dye for Monday and called it quits for the day.
Monday, I started with some gradation dyeing of chinese red and black, moved on to red/oranges with black.

Any left over dyes I used for more 3 layer parfaits.
After all the fabrics had set for their alotted times I finished off the day rinsing, rinsing, and more rinsing.
Some of the results:
Red gradations
Tray dyeing


3 layer parfaits


It was a busy weekend but enjoyable and productive.
See you soon.

Tuesday, April 20, 2010

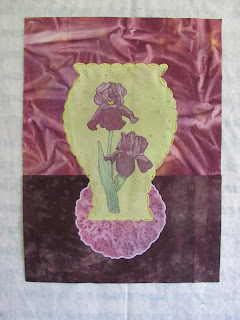
Irises in a Vase

I used the same method for the Irises as with the previous herb quilts, (stencil, Walnut Ink spray, and painting the flowers). I cut out the background fabric to showcase the irises in a vase. The doily under the vase was a sun printed fabric using a paper doily. The vase is sitting on a table. I appliqued around the vase with a decorative circle stitch to give it a cut glass effect. The doily was satin stitched in white thread.

I added the green borders around three sides and the bottom border out of a sun printed fabric using construction fencing.
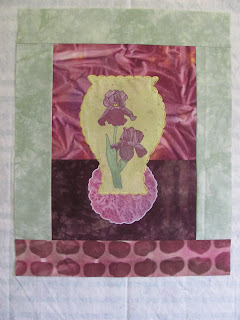

Various quilting designs were used and the quilt was finished with a facing.